I found these photos in a draft post - not exactly sure what happened at the time of me loading them on the post but they never went live, so here they are. I think the photos are self explanatory, it was really a lot of fun making this tree so am happy I came across this post! I might make some more for next Christmas now that my memory has been refreshed.
Showing posts with label DSP. Show all posts
Wednesday, February 6, 2013
Saturday, May 7, 2011
Driving by to say hi - trying my hand at interactive cards
Well, what a lot of fun this was to make! Definitely not a 'make and take' option but made for the pure pleasure of it.
I had purchased a cardmaking magazine which advertised interactive cards and after much reading and re-reading the instructions here is the result. I think I will put a small greeting somewhere down the bottom, but will leave as is for the moment.
What I used:
Card: Tempting Turquoise, Whisper White, Soft Suede,Play Date DSP, Haiku DSP (retired)
Ink: Tempting Turquoise, Baja Breeze, Old Olive, Pumpkin Pie, Basic Black marker.
Stamp Sets: Loads of Love, Fox and Friends
Tools and other fun stuff: Scallop Oval punch, Square Lattice embossing folder, Scallop Border punch, 1/4" Chocolate Chip grosgrain ribbon (retired), stamping sponges and quite a lot of glue!
I had purchased a cardmaking magazine which advertised interactive cards and after much reading and re-reading the instructions here is the result. I think I will put a small greeting somewhere down the bottom, but will leave as is for the moment.
What I used:
Card: Tempting Turquoise, Whisper White, Soft Suede,Play Date DSP, Haiku DSP (retired)
Ink: Tempting Turquoise, Baja Breeze, Old Olive, Pumpkin Pie, Basic Black marker.
Stamp Sets: Loads of Love, Fox and Friends
Tools and other fun stuff: Scallop Oval punch, Square Lattice embossing folder, Scallop Border punch, 1/4" Chocolate Chip grosgrain ribbon (retired), stamping sponges and quite a lot of glue!
Friday, March 4, 2011
Friend to Friend
As you may have already guessed I still had the same materials on my desk from yesterday's card when I decided to make this one!
What happened yesterday was that I heat embossed two butterflies, one on Very Vanilla and one on Riding Hood Red as I wasn't exactly sure which one I'd use at the time, which of course meant I had one left over. It seemed such a shame to waste it that I built today's card around it (whereas yesterday the butterfly was the last element I decided to add - funny how the creative process works at times!)
I've always liked the sheet of DSP with the floral flourish in one corner and this was the perfect time to showcase it as well.
What I used:
Card: Riding Hood Red, Crumb Cake, Very Venilla, Love Letters DSP
Ink: Crumb Cake, Riding Hood Red, Versamark Watermark Pad.
Stamp Sets: Teeny Tiny Sentiments, Butterfly Prints
Tools and other fun stuff: Butterfly punch, Wide Oval punch, Basic Pearls, Square Lattice embossing folder, Scallop Border punch, Word Window punch, Stampin' dimensionals, Stampin' sponges, paper piercing tool and mat pack.
What happened yesterday was that I heat embossed two butterflies, one on Very Vanilla and one on Riding Hood Red as I wasn't exactly sure which one I'd use at the time, which of course meant I had one left over. It seemed such a shame to waste it that I built today's card around it (whereas yesterday the butterfly was the last element I decided to add - funny how the creative process works at times!)
I've always liked the sheet of DSP with the floral flourish in one corner and this was the perfect time to showcase it as well.
What I used:
Card: Riding Hood Red, Crumb Cake, Very Venilla, Love Letters DSP
Ink: Crumb Cake, Riding Hood Red, Versamark Watermark Pad.
Stamp Sets: Teeny Tiny Sentiments, Butterfly Prints
Tools and other fun stuff: Butterfly punch, Wide Oval punch, Basic Pearls, Square Lattice embossing folder, Scallop Border punch, Word Window punch, Stampin' dimensionals, Stampin' sponges, paper piercing tool and mat pack.
Thursday, March 3, 2011
Butterfly Love Letter
It's been a while since I last posted and my parents aren't even here yet! Too much going on this week plus a total lack of inspiration I feel has been to blame, but today I managed to get to my crafty corner and make a card. I had been meaning to use some more of my Love Letters DSP and in this card have combined that paper with the Buttlerfly Prints stamp set and am very pleased with the result.
And I was quite pleased how one of the Butterfly Prints actually matched the DSP houndstooth design!
I used quite a few techniques including heat embossing, dry embossing, sponging and background stamping.
What I used:
Card: Riding Hood Red, Very Vanilla, Crumb Cake, Love Letters DSP
Ink: Riding Hood Red, Crumb Cake, Versamark Watermark ink.
Stamp set: Butterfly prints
Tools and other fun stuff: Square Scallop punch, Butterfly Punch, Vintage Wallpaper embossing folder, Basic Pearls, Stampin' sponges, embossing heat tool, black embossing powder, Stampin' dimensionals.
And I was quite pleased how one of the Butterfly Prints actually matched the DSP houndstooth design!
I used quite a few techniques including heat embossing, dry embossing, sponging and background stamping.
What I used:
Card: Riding Hood Red, Very Vanilla, Crumb Cake, Love Letters DSP
Ink: Riding Hood Red, Crumb Cake, Versamark Watermark ink.
Stamp set: Butterfly prints
Tools and other fun stuff: Square Scallop punch, Butterfly Punch, Vintage Wallpaper embossing folder, Basic Pearls, Stampin' sponges, embossing heat tool, black embossing powder, Stampin' dimensionals.
Tuesday, March 1, 2011
A few more "Thinking of You" cards
I have always loved this particular sheet of Haiku DSP (sadly retired) but was never quite sure what to do with it exactly so when I decided to feature DSP on my cards for Christchurch this one came to mind. I'm really happy how they turned out, they are super simple but quite striking too - love that Tangerine Tango!
Once again, I combined beautiful DSP with the bird punch, added a punched greeting and voilĂ ! I did emboss the bird and branch for a little bit of texture too.
What I used:
Card: Tangerine Tango, Old Olive, So Saffron, Whisper White, Haiku DSP (retired)
Ink: Chocolate Chip, Basic Black Stampin' Write marker.
Stamp Set: Sincere Salutations
Tools and other fun stuff: 2 Step Bird punch, Wide Oval punch, Scalloped Oval punch, Square Lattice embossing folder.
Once again, I combined beautiful DSP with the bird punch, added a punched greeting and voilĂ ! I did emboss the bird and branch for a little bit of texture too.
What I used:
Card: Tangerine Tango, Old Olive, So Saffron, Whisper White, Haiku DSP (retired)
Ink: Chocolate Chip, Basic Black Stampin' Write marker.
Stamp Set: Sincere Salutations
Tools and other fun stuff: 2 Step Bird punch, Wide Oval punch, Scalloped Oval punch, Square Lattice embossing folder.
Sunday, February 27, 2011
Bird Punch Play Date
Here is the second of the cards made for Christchurch. I'm also using this layout for as a Make and Take for my first "Craft and My Place" event on the 5th of March - if you live in Wellington and would like to come along that day, let me know so I can give the address details.
What I used:
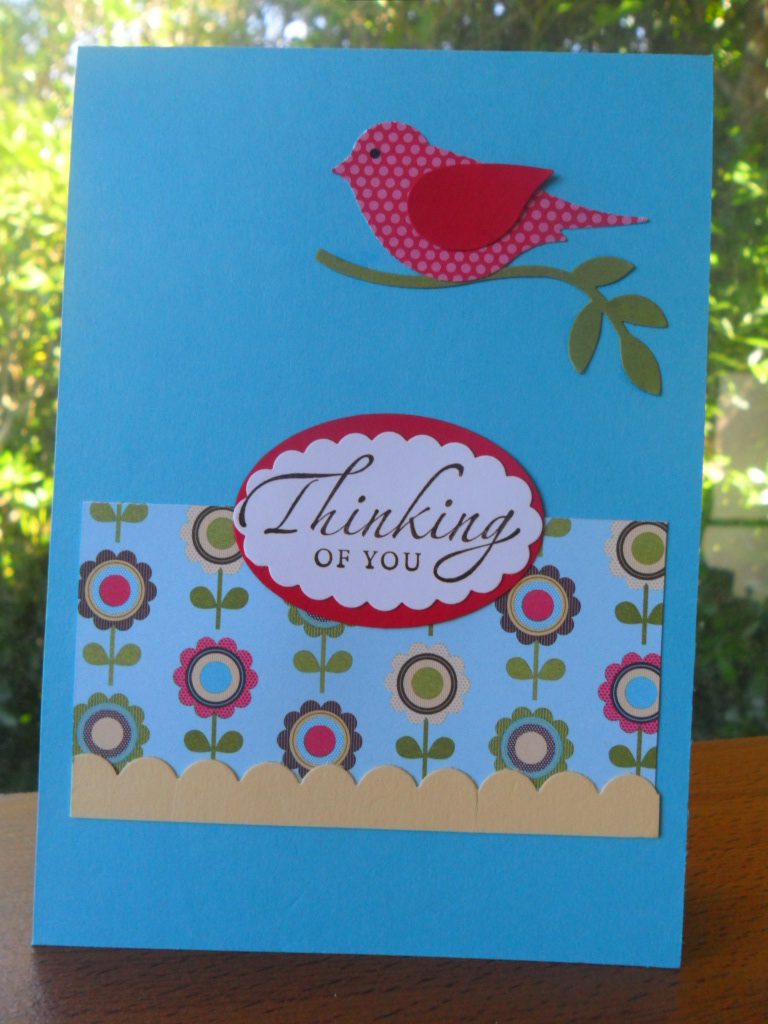
Card: Tempting Turquoise, So Saffron, Real Red, Old Olive, Play Date DSP
Ink: Chocolate Chip, Basic Black Stampin' Write marker.
Stamp Set: Sincere Salutations
Tools and other fun stuff:: 2 Step Bird Punch, Scallop Border punch, Wide Oval Punch, Scallop Oval punch.
What I used:
Card: Tempting Turquoise, So Saffron, Real Red, Old Olive, Play Date DSP
Ink: Chocolate Chip, Basic Black Stampin' Write marker.
Stamp Set: Sincere Salutations
Tools and other fun stuff:: 2 Step Bird Punch, Scallop Border punch, Wide Oval Punch, Scallop Oval punch.
Friday, February 25, 2011
Thinking of You
Cardmakers are getting together and making cards to send to Christchurch to be distributed by Victim Support and though it seems such a little thing to do, I sincerely hope my cards bring a little peace to someone amidst the chaos down there at the moment. I sat at my desk and made some yesterday which I'll show to you over the next couple of days.
The following message came via the Just Add Ink blog:
"Victim Support are a group affiliated with the NZ police force and are trained in dealing everyday with adversity, helping and supporting people in need.
We thought they would appreciate some cards that they could write in and to take to victims of this devastating quake.
If you would like to do the same then you can send a home made card (blank inside with envelope if possible) to -
Victim Support
PO Box 2109
Christchurch
New Zealand
Thinking of you, get well soon, with sympathy or just a plain blank card would be appreciated"
I wanted to made a nice bright card so chose my favourite DSP called Play Date to feature in this card, and as Christchurch is the city of flowers thought it was very appropriate.
What I used:
Card: Tempting Turquoise, Read Red, Whisper White, Play Date DSP
Ink: Chocolate Chip
Stamp Set: Sincere Salutations
Tools and other fun stuff: Butterfly punch, Wide Oval punch, Scalloped Oval punch, Rhinestone.
The following message came via the Just Add Ink blog:
"Victim Support are a group affiliated with the NZ police force and are trained in dealing everyday with adversity, helping and supporting people in need.
We thought they would appreciate some cards that they could write in and to take to victims of this devastating quake.
If you would like to do the same then you can send a home made card (blank inside with envelope if possible) to -
Victim Support
PO Box 2109
Christchurch
New Zealand
Thinking of you, get well soon, with sympathy or just a plain blank card would be appreciated"
I wanted to made a nice bright card so chose my favourite DSP called Play Date to feature in this card, and as Christchurch is the city of flowers thought it was very appropriate.
What I used:
Card: Tempting Turquoise, Read Red, Whisper White, Play Date DSP
Ink: Chocolate Chip
Stamp Set: Sincere Salutations
Tools and other fun stuff: Butterfly punch, Wide Oval punch, Scalloped Oval punch, Rhinestone.
Friday, February 4, 2011
February birthdays
Second post of the day!
For some reason February seems to be rather full of birthdays in our family, a niece, a nephew, my brother, two of my sister-in-laws plus a cousin of Carlos (and I may have even missed some off that list!).
Anyway, both my brother and one of my SILs are turning 50 this month, I've already posted one card off to Chile, and today I got stuck into the enjoyable task of creating a card for my brother who lives in Melbourne. It is quite a different thought process when you are creating with a specific person in mind, I spent an enjoyable hour reminiscing about teenage years whilst I created, yet all the time bearing in mind that the last card I sent him arrived in pieces!! Not sure what the postie did but this time it is NOT going to happen! I glued, then I sewed, then I glued it again all together with WOODWORK glue (I know, terrible thing to admit to!....). Now, if this birthday card falls to bits in the post I know what he is getting next year - a single layer card!
It was great to have an excuse to follow a sketch on Stamping 411 AND ink up a new set called Autumn Days - I tend to choose nature inspired stamp sets so this was perfect when I saw it in the catalogue. Not sure if you can see it in the photo but I embossed the DSP and then sponged it a little with Old Olive, I also did some tone on tone stamping on the bottom area of the card for an added layer of interest. All I needed to really be true to the sketch was three little brads but I don't own any - yet - so will leave them off 'till next time.
(I think the camera was playing tricks today, the card is definitely square and trim, it looks a bit strange in this photo!)
What I used:
Card: Chocolate Chip, Very Vanilla, Pumpkin Pie, Play Date DSP
Ink: Chocolate Chip, Pumpkin Pie, Old Olive
Stamp sets: Autumn Days, Teeny Tiny Sentiments (I'm getting a lot of mileage out of this set!)
Tools and other fun stuff: Scallop border punch, Large Oval punch, Scalloped Oval punch, swiss dots EF, Stampin' Sponges, 1/4" Chocolate Chip grosgrain ribbon (retired), Stampin' Dimensionals, sewing machine.
For some reason February seems to be rather full of birthdays in our family, a niece, a nephew, my brother, two of my sister-in-laws plus a cousin of Carlos (and I may have even missed some off that list!).
Anyway, both my brother and one of my SILs are turning 50 this month, I've already posted one card off to Chile, and today I got stuck into the enjoyable task of creating a card for my brother who lives in Melbourne. It is quite a different thought process when you are creating with a specific person in mind, I spent an enjoyable hour reminiscing about teenage years whilst I created, yet all the time bearing in mind that the last card I sent him arrived in pieces!! Not sure what the postie did but this time it is NOT going to happen! I glued, then I sewed, then I glued it again all together with WOODWORK glue (I know, terrible thing to admit to!....). Now, if this birthday card falls to bits in the post I know what he is getting next year - a single layer card!
It was great to have an excuse to follow a sketch on Stamping 411 AND ink up a new set called Autumn Days - I tend to choose nature inspired stamp sets so this was perfect when I saw it in the catalogue. Not sure if you can see it in the photo but I embossed the DSP and then sponged it a little with Old Olive, I also did some tone on tone stamping on the bottom area of the card for an added layer of interest. All I needed to really be true to the sketch was three little brads but I don't own any - yet - so will leave them off 'till next time.
(I think the camera was playing tricks today, the card is definitely square and trim, it looks a bit strange in this photo!)
What I used:
Card: Chocolate Chip, Very Vanilla, Pumpkin Pie, Play Date DSP
Ink: Chocolate Chip, Pumpkin Pie, Old Olive
Stamp sets: Autumn Days, Teeny Tiny Sentiments (I'm getting a lot of mileage out of this set!)
Tools and other fun stuff: Scallop border punch, Large Oval punch, Scalloped Oval punch, swiss dots EF, Stampin' Sponges, 1/4" Chocolate Chip grosgrain ribbon (retired), Stampin' Dimensionals, sewing machine.
Tuesday, February 1, 2011
Showcasing Celebrations DSP and Mojo Monday
At the weekend I went to visit Keryn for a crafting session and made a few cards which I'll show you over the next few days.
This is the first one designed by Keryn, made with the Celebrations DSP, a riot of bright colours including Real Red, Pear Pizazz, pacific Point and Bashful Blue.
Come and join me on my Facebook page too!
What I used:
Card: Pacific Point, Pear Pizazz, Real Red, Bashful Blue, Celebrations DSP
Ink: Pacific Point
Stamp Sets: Teeny Tiny Sentiments
Tools and other fun stuff: Scallop circle punch, 1 3/8" circle punch, Pear Pizazz poly-stitched ribbon.
Mojo Monday 176
Two cards in one post today!
I've never made a round card until now so had to figure out a few things along the way, how to cut it, how to make it stand up, etc. For the background I crumpled up a piece of SU's packaging paper, smoothed it out and dabbed it with Soft Suede and Old Olive ink pads. I also added some faux stitching around the edge with a Chocolate Chip marker. Looking at the card now I feel it needs a layer of red between the background inked paper and the Soft Suede card base, maybe next time! I took my cue from this week's Mojo Monday sketch and here is what I made:
What I used:
Card: Soft Suede, Very Vanilla, Old Olive, Haiku DSP (retired), Real Red, SU packaging craft paper.
Ink: Soft Suede, Old Olive, Basic Black and Chocolate Chip Stampin' Write marker.
Stamp Set: Basic Phrases.
Tools and other fun stuff: 2-Step Bird punch, Word Window punch, Stampin' Dimensionals, Stampin' sponges.
This is the first one designed by Keryn, made with the Celebrations DSP, a riot of bright colours including Real Red, Pear Pizazz, pacific Point and Bashful Blue.
Come and join me on my Facebook page too!
What I used:
Card: Pacific Point, Pear Pizazz, Real Red, Bashful Blue, Celebrations DSP
Ink: Pacific Point
Stamp Sets: Teeny Tiny Sentiments
Tools and other fun stuff: Scallop circle punch, 1 3/8" circle punch, Pear Pizazz poly-stitched ribbon.
Mojo Monday 176
Two cards in one post today!
I've never made a round card until now so had to figure out a few things along the way, how to cut it, how to make it stand up, etc. For the background I crumpled up a piece of SU's packaging paper, smoothed it out and dabbed it with Soft Suede and Old Olive ink pads. I also added some faux stitching around the edge with a Chocolate Chip marker. Looking at the card now I feel it needs a layer of red between the background inked paper and the Soft Suede card base, maybe next time! I took my cue from this week's Mojo Monday sketch and here is what I made:
What I used:
Card: Soft Suede, Very Vanilla, Old Olive, Haiku DSP (retired), Real Red, SU packaging craft paper.
Ink: Soft Suede, Old Olive, Basic Black and Chocolate Chip Stampin' Write marker.
Stamp Set: Basic Phrases.
Tools and other fun stuff: 2-Step Bird punch, Word Window punch, Stampin' Dimensionals, Stampin' sponges.
Friday, January 28, 2011
Silhouette notebook and decorated pen
My upline, Keryn Campbell, had a lovely project on her blog the other day where she decorated a notebook and pen with DSP and stamped images and I thought I'd give it a try too. It looked really effective, here is my version.
I've learnt lots along the way this morning:
1. Don't choose a DSP unless you have the matching inks and ribbons! I thought I'd be frugal and use up some of last years Tea Party DSP only to find that what I thought was So Saffron and Bashful Blue turned out to be Apricot Appeal and Almost Amethyst! Anyway, I stamped the image with Bashful Blue and the ribbon is So Saffron, and it turned out fine in the end after my initial panic.
2. When sticking the DSP to the notebook cover don't pull it too tight otherwise the notebook will not close properly...
3. Don't use a 'wet glue' to glue the DSP down - or your inside pages with become nice and wrinkled...
4. I found inserting the DSP into the pen the easiest part of the entire project thanks to Keryn's very clear instructions.
5. And finally, if you can find pens with caps that match your colours it would be so much better!
Anyway, here are a couple of photos of what I made.
I've learnt lots along the way this morning:
1. Don't choose a DSP unless you have the matching inks and ribbons! I thought I'd be frugal and use up some of last years Tea Party DSP only to find that what I thought was So Saffron and Bashful Blue turned out to be Apricot Appeal and Almost Amethyst! Anyway, I stamped the image with Bashful Blue and the ribbon is So Saffron, and it turned out fine in the end after my initial panic.
2. When sticking the DSP to the notebook cover don't pull it too tight otherwise the notebook will not close properly...
3. Don't use a 'wet glue' to glue the DSP down - or your inside pages with become nice and wrinkled...
4. I found inserting the DSP into the pen the easiest part of the entire project thanks to Keryn's very clear instructions.
5. And finally, if you can find pens with caps that match your colours it would be so much better!
Anyway, here are a couple of photos of what I made.
What I used:
Card: Almost Amethyst (Retired), White, Tea Party DSP (retired)
Ink: Bashful Blue
Stamp Set: Easter Blossoms
Tools and other fun stuff: So Saffron 5/8" grosgrain ribbon (retired), Scallop Border punch.
Friday, January 21, 2011
My first CAS Challenge card
There seems to be a lot of 'firsts' going on in this blog - and I guess part of the reason of starting a blog was so I could participate in challenges but the main reason was I seem to have a lot to type about Stampin' Up! and Facebook was somewhat constricting at times.
Without further ado here is my first CAS (Clean and Simple) card. There are various degrees of CAS and I think my card may be pushing the boundaries today a little as it has a couple of layers, but there are no ribbons, embellishments, frills etc, so I feel it qualifies - at least I hope it does!
Ever since I started this blog I'd been wondering how to link pages to this site and it finally occurred to me to ask my teenage son!
You can view the CAS challenge here. (Thanks son for showing me how to add links to my blog!)
What I used:
Card: Very Vanilla, Chocolate Chip, Play Date DSP
Ink: Chocolate Chip
Stamp sets: Teeny Tiny Sentiments, Fox and Friends
Tools and other fun stuff: Stampa-ma-jig, 1 3/4" circle punch, corner rounder punch, 2" circle template and cutter (non SU)
Without further ado here is my first CAS (Clean and Simple) card. There are various degrees of CAS and I think my card may be pushing the boundaries today a little as it has a couple of layers, but there are no ribbons, embellishments, frills etc, so I feel it qualifies - at least I hope it does!
Ever since I started this blog I'd been wondering how to link pages to this site and it finally occurred to me to ask my teenage son!
You can view the CAS challenge here. (Thanks son for showing me how to add links to my blog!)
What I used:
Card: Very Vanilla, Chocolate Chip, Play Date DSP
Ink: Chocolate Chip
Stamp sets: Teeny Tiny Sentiments, Fox and Friends
Tools and other fun stuff: Stampa-ma-jig, 1 3/4" circle punch, corner rounder punch, 2" circle template and cutter (non SU)
Thursday, January 20, 2011
Vintage Love Letter
Hello again, well I finally figured out how to change the reactions on my post, now only have 'feel good' ones - well, it is my blog after all LOL!!
I've had a busy morning today, thought I would have got a little more done by now but can't really complain...
Here is today's card - followed a sketch this time from Stamping 411 which was quite straight forward so all's good. Can you spot the difference??? Of course you can! The first card looked a little naked so just had to add the greeting, now it's ready to give to someone!
What I used:
Card: Riding Hood Red, Black, Very Vanilla, Love Letter DSP
Ink: Riding Hood Red, Soft Suede
Stamp sets: Easter Blossoms, Sincere Salutations
Tools and other fun stuff: Large Oval punch, Scalloped Oval punch, Buttons #5 Sizzlits die, Stampin' Dimensionals, stamping sponges.
I've had a busy morning today, thought I would have got a little more done by now but can't really complain...
Here is today's card - followed a sketch this time from Stamping 411 which was quite straight forward so all's good. Can you spot the difference??? Of course you can! The first card looked a little naked so just had to add the greeting, now it's ready to give to someone!
What I used:
Card: Riding Hood Red, Black, Very Vanilla, Love Letter DSP
Ink: Riding Hood Red, Soft Suede
Stamp sets: Easter Blossoms, Sincere Salutations
Tools and other fun stuff: Large Oval punch, Scalloped Oval punch, Buttons #5 Sizzlits die, Stampin' Dimensionals, stamping sponges.
Subscribe to:
Posts (Atom)