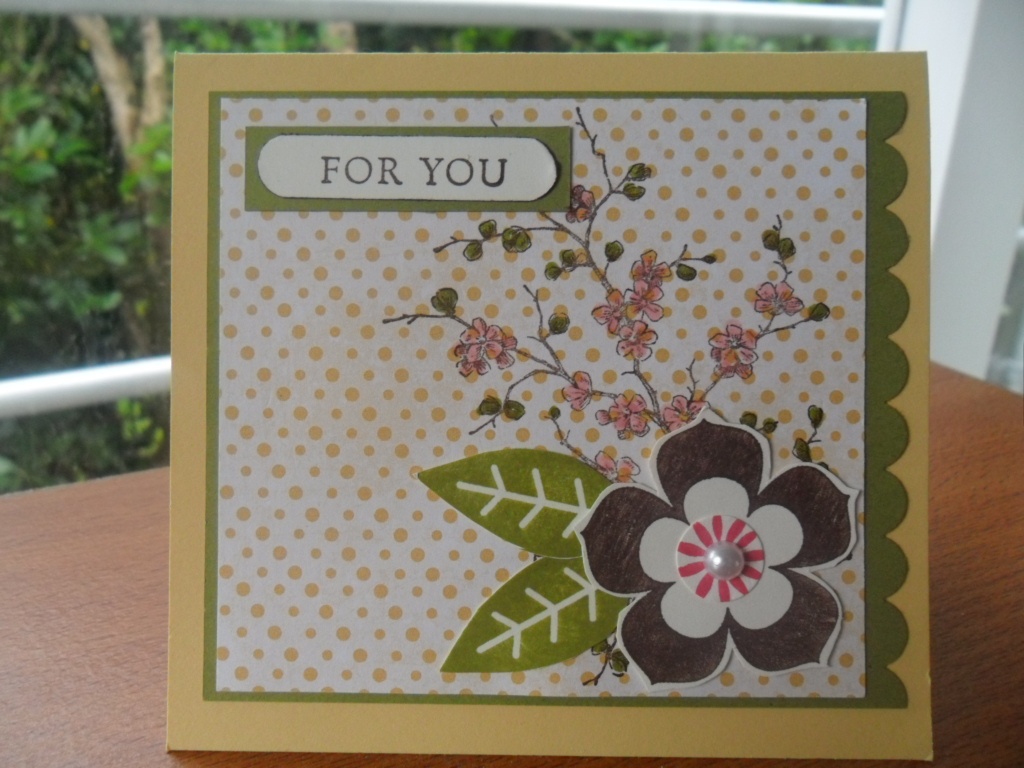
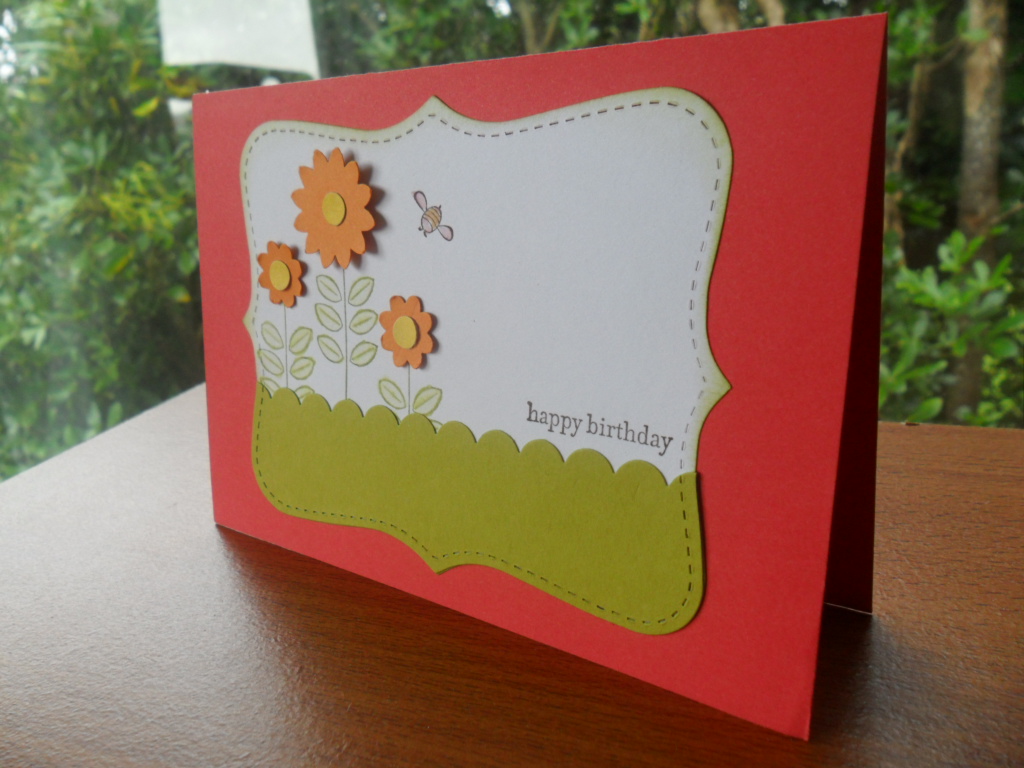
It's not to late to join in Keryn's challenge for this week - here is my take on her challenge, to use Tempting Turquoise, Real Red, Daffodil Delight and Whisper White.
Showing posts with label Teeny Tiny Sentiments. Show all posts
Tuesday, December 6, 2011
Monday, November 28, 2011
Nature Walk Tag
I made this with Keryn's Friday challenge in mind : Ducks!
I know it's pushing the boundaries a bit, but seeing as I don't own any duck images I thought I'd use this delightful bird instead.
And I finally figured out how to make the banner bow out in the centre - use a Dimensional under the middle part and glue down the two ends!
What I used:
Card: Baja Breeze, Crumb Cake, Very Vanilla
Ink: Soft Suede
Stamp Sets: Nature Walk, Teeny Tiny Sentiments
Tools and other fun stuff: Vintage Wallpaper EF, Scallop Border punch, Stampin' sponges, Stampin' Dimensionals, Vanilla Taffeta ribbon, Bakers' Twine, Basic pearls.
I know it's pushing the boundaries a bit, but seeing as I don't own any duck images I thought I'd use this delightful bird instead.
And I finally figured out how to make the banner bow out in the centre - use a Dimensional under the middle part and glue down the two ends!
What I used:
Card: Baja Breeze, Crumb Cake, Very Vanilla
Ink: Soft Suede
Stamp Sets: Nature Walk, Teeny Tiny Sentiments
Tools and other fun stuff: Vintage Wallpaper EF, Scallop Border punch, Stampin' sponges, Stampin' Dimensionals, Vanilla Taffeta ribbon, Bakers' Twine, Basic pearls.
Thursday, November 17, 2011
Contempo Christmas Top Note
Was playing around with some retired Jolly Holly DSP from last year and to start with was going to use some Delightly Decoration ornaments, but in the end decided that this cute Christmas tree was the way to go...
If you look very carefully you'll see I used a snippet [aka left-over] of Old Olive card on the centre join - it was from a previous Top Note shape, thought the curvy shape went quite well!
What I used:
Card: Cherry Cobbler, Very Vanilla, Old Olive, Holly Jolly DSP (retired)
Ink: Cherry Cobbler, Old Olive
Stamp Sets: Contempo Christmas, Teeny Tiny Sentiments
Tools and other fun stuff: Top Note Die, Stamp-a-ma-jig, corner rounder punch.
If you look very carefully you'll see I used a snippet [aka left-over] of Old Olive card on the centre join - it was from a previous Top Note shape, thought the curvy shape went quite well!
What I used:
Card: Cherry Cobbler, Very Vanilla, Old Olive, Holly Jolly DSP (retired)
Stamp Sets: Contempo Christmas, Teeny Tiny Sentiments
Tools and other fun stuff: Top Note Die, Stamp-a-ma-jig, corner rounder punch.
Sunday, September 4, 2011
Happy Fathers' Day!
It's Fathers' Day here in NZ and Australia (and quite likely a few other places as well) - so I made this card for my husband as he is a wonderful father!
I used an 'oldie but a goodie' which is this origami shirt - I can finally make one without referring to instructions - I was rather origami-challenged there for a while, especially when it came to the collar. Anyway, the tutorial I used when I was learning to make it can be found here, pop over and pay the creator a visit if you like.
What I used:
Card: Pacific Point, Old Olive, White, retired DSP
Ink:Old Olive, Pacific Point
Stamp Sets: Teeny Tiny Sentiments, Autumn Days
Tools and other fun stuff: Square Lattice embossing folder, Word Window punch.
I used an 'oldie but a goodie' which is this origami shirt - I can finally make one without referring to instructions - I was rather origami-challenged there for a while, especially when it came to the collar. Anyway, the tutorial I used when I was learning to make it can be found here, pop over and pay the creator a visit if you like.
What I used:
Card: Pacific Point, Old Olive, White, retired DSP
Ink:Old Olive, Pacific Point
Stamp Sets: Teeny Tiny Sentiments, Autumn Days
Tools and other fun stuff: Square Lattice embossing folder, Word Window punch.
Friday, August 19, 2011
Soon to retire - Eastern Blooms
A very short post today!
Here a a few cards I made this past year using the Eastern Blooms set retiring at the end of this month.
It is a lovely set and quite versatile, if you'd like to order one please get in touch with me.
Monday, August 15, 2011
Samples of soon-to-retire products - Petal Pizazz
Just thought I'd show you some samples of cards I made with the Petal Pizazz set which retires at the end of the month.
If you love bold coloured images this set is for you! I've loved using it and am sad it is retiring, but on the bright side there will be lots of new sets to fall in love with in the new catalogue due out on 1st September.
Another update on sold out products from the Last Chance list:
If there is anything you need to purchase before the retire/sell out please get in touch with me as soon as possible.
If you love bold coloured images this set is for you! I've loved using it and am sad it is retiring, but on the bright side there will be lots of new sets to fall in love with in the new catalogue due out on 1st September.
Another update on sold out products from the Last Chance list:
- Stamp: Sanded
- Stamp: Full Calendar
- Stamp set: Garden Whimsy
- Stamp set: Choo choo
- 12"x12" Card: Bashful Blue
- 12"x12" Card: Rich Razzleberry
- 12"x12" Card: Chocolate Chip
- 12"x12" Card: Crumb Cake
- 12"x12" Card: Very Vanilla
- 12"x12" Card: Early Espresso
- 12"x12" Card: Night of Navy
- 12"x12" Card: Marina Mist
- Punch: Spiral
- Punch: Corner
- Punch: Large Star
- Punch: 1 3/8" x 5/8" Oval
- Embellishments: Pewter Jumbo Eyelets
- Embellishments: Antique Brass Jumbo Eyelets
- Embellishments: Metallic Eyelets
If there is anything you need to purchase before the retire/sell out please get in touch with me as soon as possible.
Friday, June 24, 2011
Birthday greetings for a friend
I'm off to a morning tea into town today to celebrate a friend's birthday - I have a strange feeling she is quite minimalist - but is definitely into buttons (makes lovely button jewellery for sale - so I tried to make a card with buttons and it just did NOT work! So after a couple of days looking at it and not at all happy, I carefully removed the buttons and replaced them with some Boho Blossoms instead and am so much happier with the result now. I really wanted to add buttons to her card as I feel it would have been quite appropriate, but maybe will re-think that project and leave it until Christmas time hehehe...
So, I tried to make it as CAS as possible, no ribbons or bows this time.
What I used:
Card: Red, Kiwi Kiss (retired), Pumpkin Pie and Daffodil Delight.
Ink: Old Olive, Chocolate Chip, So Saffron
Stamp Sets: Sweet Summer (retired), Teeny Tiny Sentiments
Tools and other fun stuff: Top Note die, Boho Blossoms punch, Scallop Border punch, Stampin' sponges, Stampin' Dimensionals, Stamp-a-Majig
So, I tried to make it as CAS as possible, no ribbons or bows this time.
| The end result after swapping buttons for flowers |
| (The card as it was with the buttons.....) |
What I used:
Card: Red, Kiwi Kiss (retired), Pumpkin Pie and Daffodil Delight.
Ink: Old Olive, Chocolate Chip, So Saffron
Stamp Sets: Sweet Summer (retired), Teeny Tiny Sentiments
Tools and other fun stuff: Top Note die, Boho Blossoms punch, Scallop Border punch, Stampin' sponges, Stampin' Dimensionals, Stamp-a-Majig
Monday, May 30, 2011
Fox and Friends thank you
We had visitors at the weekend and a friend brought around a present of Lego for Leo - he has had such a wonderful time putting it all together! So taking my cue from the gift wrap I made a wee thank you card to send to Lynette to know how much we appreciated the visit and the gift!
What I used:
Card: Chocolate Chip, Bashful Blue, Pacific Point, White, Kiwi Kiss (retired)
Ink: Pacific Point, Chocolate Chip, Baja Breeze
Stamp sets: Fox and Friends, Teeny Tiny Sentiments.
Tools and other fun stuff: Square Lattice embossing folder, 1 3/4" circle punch, Scallop Border punch, Word Window punch, non SU scallop dies.
What I used:
Card: Chocolate Chip, Bashful Blue, Pacific Point, White, Kiwi Kiss (retired)
Ink: Pacific Point, Chocolate Chip, Baja Breeze
Stamp sets: Fox and Friends, Teeny Tiny Sentiments.
Tools and other fun stuff: Square Lattice embossing folder, 1 3/4" circle punch, Scallop Border punch, Word Window punch, non SU scallop dies.
Friday, May 27, 2011
Inspired by Leo's hoody
I was searching for some colour inspiration a couple of days ago and got caught up in my son's latest top! I always find it rather amusing these days that whenever I see colours I translate them into SU names - does that happen to you? So his top is definitely Tempting Turquoise, Real Red, Daffodil Delight and Black.
I translated those colours into a card with the generous addition of white to tone it all down a little and here is what I came up with - you'll see the cheeky monkey I used for inspiration at the end of the post! (he's at that age when they will just not sit nicely for the camera, the're always pulling funny faces for the camera - I hope he outgrows this phase soon!)
What I used:
Card: Tempting Turquoise, Daffodil Delight, Real Red, Black, Play Date DSP.
Ink: Basic Black
Stamp Sets: Teeny Tiny Sentiments
Tools and other fun stuff: Floral Fusion Sizzlets die, Button #5 die, 1/4' circle punch, scalloped border punch, word window punch, dots embossing folder.
I translated those colours into a card with the generous addition of white to tone it all down a little and here is what I came up with - you'll see the cheeky monkey I used for inspiration at the end of the post! (he's at that age when they will just not sit nicely for the camera, the're always pulling funny faces for the camera - I hope he outgrows this phase soon!)
What I used:
Card: Tempting Turquoise, Daffodil Delight, Real Red, Black, Play Date DSP.
Ink: Basic Black
Stamp Sets: Teeny Tiny Sentiments
Tools and other fun stuff: Floral Fusion Sizzlets die, Button #5 die, 1/4' circle punch, scalloped border punch, word window punch, dots embossing folder.
Thursday, May 26, 2011
Happy Retirement Jo!
Our local Plunket nurse has just retired, so I wanted to make her a card to thank her for all her kindness when I used to take Leo for his checks. It's great that she lives locally too, as I get to see her in the supermarket quite often so we won't lose touch.
This card started off as an exercise in using my new Framed Tulips embossing folder to make smaller borders, the white card is 4" x 4" and it worked really well.
The great thing about embossing folders is you can use either side of the resulting embossed card, today I chose to use what is officially the 'reverse' side of it, so technically it's debossed, not embossed!
What I used:
Card: Pumpkin Pie, Whisper White, Chocolate Chip
Ink: Riding Hood Red, Pumpkin Pie, Always Artichoke
Stamp Sets: Petal Pizazz, Teeny Tiny Sentiments
Tools and other fun stuff: Scalloped Circle punch, Buttons #5 Sizzlets die, Framed Tulips embossing folder, Stampin' dimensionals, Stampin' sponges, Stamp-a-majig
This card started off as an exercise in using my new Framed Tulips embossing folder to make smaller borders, the white card is 4" x 4" and it worked really well.
The great thing about embossing folders is you can use either side of the resulting embossed card, today I chose to use what is officially the 'reverse' side of it, so technically it's debossed, not embossed!
What I used:
Card: Pumpkin Pie, Whisper White, Chocolate Chip
Ink: Riding Hood Red, Pumpkin Pie, Always Artichoke
Stamp Sets: Petal Pizazz, Teeny Tiny Sentiments
Tools and other fun stuff: Scalloped Circle punch, Buttons #5 Sizzlets die, Framed Tulips embossing folder, Stampin' dimensionals, Stampin' sponges, Stamp-a-majig
Saturday, May 14, 2011
CASEd Nature Walk just for you
The other day I was having a look through some card-making blogs and came upon one called The Pursuit of Stampin'ess - I really liked her cards and decided to copy one to share with you today. I was wanting to try some of my Daffodil Delight cardstock and even though I lacked a few of her elements I made my own up - as you do!
I was quite amazed at how heavy the card turned out, but then counted the layers and it's 8 deep when you come to the little flower - no wonder it took me all morning to assemble ... crafting on and off whilst attending to family life... lots of fun making it though.
What I used:
Card: Daffodil Delight, Baja Breeze, Whisper White, Not Quite Navy
Ink: Not quite Navy, Baja Breeze
Stamp Sets: Nature Walk, Simply Said, Teeny Tiny Sentiments
Tools and other fun stuff: Vintage Wallpaper embossing folder, Word Window punch, Boho Blossoms punch, 1/4" punch, Stampin' Dimensionals.
I was quite amazed at how heavy the card turned out, but then counted the layers and it's 8 deep when you come to the little flower - no wonder it took me all morning to assemble ... crafting on and off whilst attending to family life... lots of fun making it though.
| Here is what I came up with - a few different elements but same colours, main stamp etc. |
What I used:
Card: Daffodil Delight, Baja Breeze, Whisper White, Not Quite Navy
Ink: Not quite Navy, Baja Breeze
Stamp Sets: Nature Walk, Simply Said, Teeny Tiny Sentiments
Tools and other fun stuff: Vintage Wallpaper embossing folder, Word Window punch, Boho Blossoms punch, 1/4" punch, Stampin' Dimensionals.
Sunday, May 8, 2011
Happy Mothers' Day to all!
I would like to take this opportunity to wish all the mothers out there who may stumble across this message a very happy Mothers' Day! Hope your day is a special one, and that the pampering is not only restricted to today!
A few days ago I was once again having a play with the Framed Tulips embossing folder, trying to figure out a way to have the base card showing around it. It is possible, but it means you have to cut your base card slightly wider than the average A4 size - the dimensions I used for my red background worked out to be 8 7/8" x 5 3/4". I originally cut it at 9" but then found it would not fit a C6 envelope, so trimmed a teeny bit off and it worked perfectly. It does mean you have to cut your base lengthways if using an A4 sheet, but that's the price for getting it exactly as I wanted it!
Had lots of fun with this one, it evolved throughout the morning (good thing my mum is away for a couple of days!) I started off by embossing a piece of Soft Suede (4" x 5 1/4"), then I applied Versamark ink to the edges where the tulips are, added gold embossing powder and heat-set it - it ended up looking like an antique gilded picture frame! Using the Petal Pizazz stamp set I stamped three flowers in Pumpkin Pie and Cherry Cobbler, sponged the edges with Riding Hood Red. Stamped a few leaves in Old Olive, cut them out, sponged the edges again, found some Riding Hood Red buttons in my stash, added those to the flowers as centres. After assembling all the layers and flowers all that was needed was a sentiment.
Tip of the day! Do not lay your card to be heat embossed on your self-healing cutting mat when applying heat!!! I almost ruined my 25+ year old mat, luckily I realized just in time and was able to reverse the buckling by placing a heavy item on top of it as it cooled down....
What I used:
Card: Riding Hood Red, Soft Suede, Very Vanilla
Ink: Old Olive, Riding Hood Red, Pumpkin Pie, Cherry Cobler
Stamp Sets: Petal Pizazz, Teeny Tiny Sentiments
Tools and other fun stuff: Scallop Circle punch, Buttons #5 Sizzlets die, Framed Tulip embossing folder, embossing buddy, heat gun, gold embossing powder, Stampin' sponges, Stamp-a-majig
A few days ago I was once again having a play with the Framed Tulips embossing folder, trying to figure out a way to have the base card showing around it. It is possible, but it means you have to cut your base card slightly wider than the average A4 size - the dimensions I used for my red background worked out to be 8 7/8" x 5 3/4". I originally cut it at 9" but then found it would not fit a C6 envelope, so trimmed a teeny bit off and it worked perfectly. It does mean you have to cut your base lengthways if using an A4 sheet, but that's the price for getting it exactly as I wanted it!
Had lots of fun with this one, it evolved throughout the morning (good thing my mum is away for a couple of days!) I started off by embossing a piece of Soft Suede (4" x 5 1/4"), then I applied Versamark ink to the edges where the tulips are, added gold embossing powder and heat-set it - it ended up looking like an antique gilded picture frame! Using the Petal Pizazz stamp set I stamped three flowers in Pumpkin Pie and Cherry Cobbler, sponged the edges with Riding Hood Red. Stamped a few leaves in Old Olive, cut them out, sponged the edges again, found some Riding Hood Red buttons in my stash, added those to the flowers as centres. After assembling all the layers and flowers all that was needed was a sentiment.
Tip of the day! Do not lay your card to be heat embossed on your self-healing cutting mat when applying heat!!! I almost ruined my 25+ year old mat, luckily I realized just in time and was able to reverse the buckling by placing a heavy item on top of it as it cooled down....
What I used:
Card: Riding Hood Red, Soft Suede, Very Vanilla
Ink: Old Olive, Riding Hood Red, Pumpkin Pie, Cherry Cobler
Stamp Sets: Petal Pizazz, Teeny Tiny Sentiments
Tools and other fun stuff: Scallop Circle punch, Buttons #5 Sizzlets die, Framed Tulip embossing folder, embossing buddy, heat gun, gold embossing powder, Stampin' sponges, Stamp-a-majig
Sunday, April 3, 2011
Make and takes
I held my first stall at a school fair yesterday and it was a very interesting experience! Sold a few cards, had a couple of leads, I enjoyed it. (My typing is a little limited today so this will be brief!)
Here are the 'make and takes' I made for this occasion.
What I used:
Card: Cherry Cobbler, So Saffron, Very Vanilla
Ink: Old Olive, Pumpkin Pie, Cherry Cobbler
Stamp sets: Petal Pizazz, Teeny Tiny Sentiments, Butterfly Prints, Easter Blossoms (from Summer Mini)
Tools and other fun stuff: Scallop Circle punch, Butterfly Punch, Large Oval punch, Scalloped Oval punch, Vintage Wallpaper embossing folder, Basic Pearls, Rhinestones.
Here are the 'make and takes' I made for this occasion.
What I used:
Card: Cherry Cobbler, So Saffron, Very Vanilla
Ink: Old Olive, Pumpkin Pie, Cherry Cobbler
Stamp sets: Petal Pizazz, Teeny Tiny Sentiments, Butterfly Prints, Easter Blossoms (from Summer Mini)
Tools and other fun stuff: Scallop Circle punch, Butterfly Punch, Large Oval punch, Scalloped Oval punch, Vintage Wallpaper embossing folder, Basic Pearls, Rhinestones.
Friday, March 4, 2011
Friend to Friend
As you may have already guessed I still had the same materials on my desk from yesterday's card when I decided to make this one!
What happened yesterday was that I heat embossed two butterflies, one on Very Vanilla and one on Riding Hood Red as I wasn't exactly sure which one I'd use at the time, which of course meant I had one left over. It seemed such a shame to waste it that I built today's card around it (whereas yesterday the butterfly was the last element I decided to add - funny how the creative process works at times!)
I've always liked the sheet of DSP with the floral flourish in one corner and this was the perfect time to showcase it as well.
What I used:
Card: Riding Hood Red, Crumb Cake, Very Venilla, Love Letters DSP
Ink: Crumb Cake, Riding Hood Red, Versamark Watermark Pad.
Stamp Sets: Teeny Tiny Sentiments, Butterfly Prints
Tools and other fun stuff: Butterfly punch, Wide Oval punch, Basic Pearls, Square Lattice embossing folder, Scallop Border punch, Word Window punch, Stampin' dimensionals, Stampin' sponges, paper piercing tool and mat pack.
What happened yesterday was that I heat embossed two butterflies, one on Very Vanilla and one on Riding Hood Red as I wasn't exactly sure which one I'd use at the time, which of course meant I had one left over. It seemed such a shame to waste it that I built today's card around it (whereas yesterday the butterfly was the last element I decided to add - funny how the creative process works at times!)
I've always liked the sheet of DSP with the floral flourish in one corner and this was the perfect time to showcase it as well.
What I used:
Card: Riding Hood Red, Crumb Cake, Very Venilla, Love Letters DSP
Ink: Crumb Cake, Riding Hood Red, Versamark Watermark Pad.
Stamp Sets: Teeny Tiny Sentiments, Butterfly Prints
Tools and other fun stuff: Butterfly punch, Wide Oval punch, Basic Pearls, Square Lattice embossing folder, Scallop Border punch, Word Window punch, Stampin' dimensionals, Stampin' sponges, paper piercing tool and mat pack.
Wednesday, February 23, 2011
Daisy, daisy!
Here is the third and final sympathy card, I thought I had finished it a couple of days ago but wasn't 100% happy with it, it seemed to lack 'something' so this morning I added the scalloped strip of Soft Suede and now am much happier with it, it looks a lot more balanced to me now. This stamp set was part of our kit at our Regional Training last year and I really need to use it more. It also includes a pretty bird image, I'll see if I can find a photo to show you too!
I did manage to find photos of the other cards, it is a great image for using your watercolouring technique, and the wee bird (a finch perhaps?) can be coloured any colour you like!
What I used for the Daisy sympathy card:
Card: Certainly Celery, Pumpkin Pie, Soft Suede, Whisper White
Ink: So Saffron, Soft Suede, Pumpkin Pie, Old Olive
Stamp Sets: Every Moment, Teeny Tiny Sentiments
Tools and other fun Stuff: Scallop Border punch, aquapainter, Paper Piercing tool and mat, Word Window punch, corner rounder punch.
I did manage to find photos of the other cards, it is a great image for using your watercolouring technique, and the wee bird (a finch perhaps?) can be coloured any colour you like!
What I used for the Daisy sympathy card:
Card: Certainly Celery, Pumpkin Pie, Soft Suede, Whisper White
Ink: So Saffron, Soft Suede, Pumpkin Pie, Old Olive
Stamp Sets: Every Moment, Teeny Tiny Sentiments
Tools and other fun Stuff: Scallop Border punch, aquapainter, Paper Piercing tool and mat, Word Window punch, corner rounder punch.
Monday, February 21, 2011
With Sympathy
Now, I'm very grateful I don't need any sympathy cards at the moment but I'm counting on "Sod's law" that if I have some already made I won't need to use them! On the other hand, I'm also pretty sure that if and when the time comes that I do need one I probably won't feel like making one so this morning I made a couple. I actually made one yesterday and liked the layout so much I made two more in the same vein, just varying the stamp sets and very slight changes to the overall composition.
What I used:
Card: Certainly Celery, Old Olive, Whisper White
Ink: Old Olive, Certainly Celery, Pumpkin Pie
Stamp Sets: Autumn Days, Petal Prints (retired), Teeny Tiny Sentiments
Tools and other fun stuff: Word Window punch, corner rounder punch, Scallop Border punch, Certainly Celery 1/4" grosgrain ribbon (retired), Old Olive 1/8" taffeta ribbon, Stampa-ma-jig.
What I used:
Card: Certainly Celery, Old Olive, Whisper White
Ink: Old Olive, Certainly Celery, Pumpkin Pie
Stamp Sets: Autumn Days, Petal Prints (retired), Teeny Tiny Sentiments
Tools and other fun stuff: Word Window punch, corner rounder punch, Scallop Border punch, Certainly Celery 1/4" grosgrain ribbon (retired), Old Olive 1/8" taffeta ribbon, Stampa-ma-jig.
Tuesday, February 15, 2011
Red Butterflies
I know.... second post today!
Just a quick card to show you today, I like the little butterflies made with the Heart to Heart punch, thought they turned out very cute.
I used the colour combination on Diva Coffee Break's challenge this week - Real Red, Basic Gray and Pink Pirouette - as I don't actually have any of the ink pads in those three particular colours I went for a 'punch up' instead!
What I used:
Card: Pink Pirouette, Real Red, Basic Gray
Ink: Basic Black
Stamp Sets: Butterfly Prints, Teeny Tiny Sentiments
Tools and other fun stuff: Heart to Heart punch, Wide Oval punch, Large Oval punch, Scalloped Oval punch.
Just a quick card to show you today, I like the little butterflies made with the Heart to Heart punch, thought they turned out very cute.
I used the colour combination on Diva Coffee Break's challenge this week - Real Red, Basic Gray and Pink Pirouette - as I don't actually have any of the ink pads in those three particular colours I went for a 'punch up' instead!
What I used:
Card: Pink Pirouette, Real Red, Basic Gray
Ink: Basic Black
Stamp Sets: Butterfly Prints, Teeny Tiny Sentiments
Tools and other fun stuff: Heart to Heart punch, Wide Oval punch, Large Oval punch, Scalloped Oval punch.
Sunday, February 13, 2011
Sweet Summer
Sorry I've been away for a few days, was feeling rather tired and uninspired but today woke up to a gorgeous day so got motivated to make this card. I will be sending it to a friend's mother who has just had an operation, hope it cheers her up a bit!
One again I used colouring in techniques, I tried two different approaches on this card. First I coloured in the flowers by using the ink from the inkpad and a blender pen, and it worked okay, but what I'm really pleased with was something I hadn't tried before and that was of stamping the image (in this case the leaves and little bird) and then using the blender pen to drag the colour in from the sides. It worked really well as Garden Green is a very intense colour and it created a lighter tone in the middle, really pleased with that effect!
The colour combination came from the Color Dare challenge this week, and the sketch is from
Stamping 411 again. I'm pleased I found both these sites as they seem to work for me and my way of crafting!
What I used:
Card: White, Bashful Blue, Peach Parfait
Ink: Garden Green, Bashful Blue plus a hint of So Saffron
Stamp Sets: Sweet Summer, Teeny Tiny Sentiments
Tools and other fun stuff: Scallop Border punch, Square Lattice embossing folder, Word Window punch, Stampin' Dimensionals, Peach Parfait ribbon, blender pens.
One again I used colouring in techniques, I tried two different approaches on this card. First I coloured in the flowers by using the ink from the inkpad and a blender pen, and it worked okay, but what I'm really pleased with was something I hadn't tried before and that was of stamping the image (in this case the leaves and little bird) and then using the blender pen to drag the colour in from the sides. It worked really well as Garden Green is a very intense colour and it created a lighter tone in the middle, really pleased with that effect!
The colour combination came from the Color Dare challenge this week, and the sketch is from
Stamping 411 again. I'm pleased I found both these sites as they seem to work for me and my way of crafting!
What I used:
Card: White, Bashful Blue, Peach Parfait
Ink: Garden Green, Bashful Blue plus a hint of So Saffron
Stamp Sets: Sweet Summer, Teeny Tiny Sentiments
Tools and other fun stuff: Scallop Border punch, Square Lattice embossing folder, Word Window punch, Stampin' Dimensionals, Peach Parfait ribbon, blender pens.
Friday, February 4, 2011
February birthdays
Second post of the day!
For some reason February seems to be rather full of birthdays in our family, a niece, a nephew, my brother, two of my sister-in-laws plus a cousin of Carlos (and I may have even missed some off that list!).
Anyway, both my brother and one of my SILs are turning 50 this month, I've already posted one card off to Chile, and today I got stuck into the enjoyable task of creating a card for my brother who lives in Melbourne. It is quite a different thought process when you are creating with a specific person in mind, I spent an enjoyable hour reminiscing about teenage years whilst I created, yet all the time bearing in mind that the last card I sent him arrived in pieces!! Not sure what the postie did but this time it is NOT going to happen! I glued, then I sewed, then I glued it again all together with WOODWORK glue (I know, terrible thing to admit to!....). Now, if this birthday card falls to bits in the post I know what he is getting next year - a single layer card!
It was great to have an excuse to follow a sketch on Stamping 411 AND ink up a new set called Autumn Days - I tend to choose nature inspired stamp sets so this was perfect when I saw it in the catalogue. Not sure if you can see it in the photo but I embossed the DSP and then sponged it a little with Old Olive, I also did some tone on tone stamping on the bottom area of the card for an added layer of interest. All I needed to really be true to the sketch was three little brads but I don't own any - yet - so will leave them off 'till next time.
(I think the camera was playing tricks today, the card is definitely square and trim, it looks a bit strange in this photo!)
What I used:
Card: Chocolate Chip, Very Vanilla, Pumpkin Pie, Play Date DSP
Ink: Chocolate Chip, Pumpkin Pie, Old Olive
Stamp sets: Autumn Days, Teeny Tiny Sentiments (I'm getting a lot of mileage out of this set!)
Tools and other fun stuff: Scallop border punch, Large Oval punch, Scalloped Oval punch, swiss dots EF, Stampin' Sponges, 1/4" Chocolate Chip grosgrain ribbon (retired), Stampin' Dimensionals, sewing machine.
For some reason February seems to be rather full of birthdays in our family, a niece, a nephew, my brother, two of my sister-in-laws plus a cousin of Carlos (and I may have even missed some off that list!).
Anyway, both my brother and one of my SILs are turning 50 this month, I've already posted one card off to Chile, and today I got stuck into the enjoyable task of creating a card for my brother who lives in Melbourne. It is quite a different thought process when you are creating with a specific person in mind, I spent an enjoyable hour reminiscing about teenage years whilst I created, yet all the time bearing in mind that the last card I sent him arrived in pieces!! Not sure what the postie did but this time it is NOT going to happen! I glued, then I sewed, then I glued it again all together with WOODWORK glue (I know, terrible thing to admit to!....). Now, if this birthday card falls to bits in the post I know what he is getting next year - a single layer card!
It was great to have an excuse to follow a sketch on Stamping 411 AND ink up a new set called Autumn Days - I tend to choose nature inspired stamp sets so this was perfect when I saw it in the catalogue. Not sure if you can see it in the photo but I embossed the DSP and then sponged it a little with Old Olive, I also did some tone on tone stamping on the bottom area of the card for an added layer of interest. All I needed to really be true to the sketch was three little brads but I don't own any - yet - so will leave them off 'till next time.
(I think the camera was playing tricks today, the card is definitely square and trim, it looks a bit strange in this photo!)
What I used:
Card: Chocolate Chip, Very Vanilla, Pumpkin Pie, Play Date DSP
Ink: Chocolate Chip, Pumpkin Pie, Old Olive
Stamp sets: Autumn Days, Teeny Tiny Sentiments (I'm getting a lot of mileage out of this set!)
Tools and other fun stuff: Scallop border punch, Large Oval punch, Scalloped Oval punch, swiss dots EF, Stampin' Sponges, 1/4" Chocolate Chip grosgrain ribbon (retired), Stampin' Dimensionals, sewing machine.
Tuesday, February 1, 2011
Showcasing Celebrations DSP and Mojo Monday
At the weekend I went to visit Keryn for a crafting session and made a few cards which I'll show you over the next few days.
This is the first one designed by Keryn, made with the Celebrations DSP, a riot of bright colours including Real Red, Pear Pizazz, pacific Point and Bashful Blue.
Come and join me on my Facebook page too!
What I used:
Card: Pacific Point, Pear Pizazz, Real Red, Bashful Blue, Celebrations DSP
Ink: Pacific Point
Stamp Sets: Teeny Tiny Sentiments
Tools and other fun stuff: Scallop circle punch, 1 3/8" circle punch, Pear Pizazz poly-stitched ribbon.
Mojo Monday 176
Two cards in one post today!
I've never made a round card until now so had to figure out a few things along the way, how to cut it, how to make it stand up, etc. For the background I crumpled up a piece of SU's packaging paper, smoothed it out and dabbed it with Soft Suede and Old Olive ink pads. I also added some faux stitching around the edge with a Chocolate Chip marker. Looking at the card now I feel it needs a layer of red between the background inked paper and the Soft Suede card base, maybe next time! I took my cue from this week's Mojo Monday sketch and here is what I made:
What I used:
Card: Soft Suede, Very Vanilla, Old Olive, Haiku DSP (retired), Real Red, SU packaging craft paper.
Ink: Soft Suede, Old Olive, Basic Black and Chocolate Chip Stampin' Write marker.
Stamp Set: Basic Phrases.
Tools and other fun stuff: 2-Step Bird punch, Word Window punch, Stampin' Dimensionals, Stampin' sponges.
This is the first one designed by Keryn, made with the Celebrations DSP, a riot of bright colours including Real Red, Pear Pizazz, pacific Point and Bashful Blue.
Come and join me on my Facebook page too!
What I used:
Card: Pacific Point, Pear Pizazz, Real Red, Bashful Blue, Celebrations DSP
Ink: Pacific Point
Stamp Sets: Teeny Tiny Sentiments
Tools and other fun stuff: Scallop circle punch, 1 3/8" circle punch, Pear Pizazz poly-stitched ribbon.
Mojo Monday 176
Two cards in one post today!
I've never made a round card until now so had to figure out a few things along the way, how to cut it, how to make it stand up, etc. For the background I crumpled up a piece of SU's packaging paper, smoothed it out and dabbed it with Soft Suede and Old Olive ink pads. I also added some faux stitching around the edge with a Chocolate Chip marker. Looking at the card now I feel it needs a layer of red between the background inked paper and the Soft Suede card base, maybe next time! I took my cue from this week's Mojo Monday sketch and here is what I made:
What I used:
Card: Soft Suede, Very Vanilla, Old Olive, Haiku DSP (retired), Real Red, SU packaging craft paper.
Ink: Soft Suede, Old Olive, Basic Black and Chocolate Chip Stampin' Write marker.
Stamp Set: Basic Phrases.
Tools and other fun stuff: 2-Step Bird punch, Word Window punch, Stampin' Dimensionals, Stampin' sponges.
Subscribe to:
Posts (Atom)