Monday, May 30, 2011

Fox and Friends thank you

We had visitors at the weekend and a friend brought around a present of Lego for Leo - he has had such a wonderful time putting it all together!  So taking my cue from the gift wrap I made a wee thank you card to send to Lynette to know how much we appreciated the visit and the gift!


What I used:

Card:  Chocolate Chip, Bashful Blue, Pacific Point, White, Kiwi Kiss (retired)

Ink:  Pacific Point, Chocolate Chip, Baja Breeze

Stamp sets:  Fox and Friends, Teeny Tiny Sentiments.

Tools and other fun stuff:  Square Lattice embossing folder, 1 3/4" circle punch, Scallop Border punch, Word Window punch, non SU scallop dies.

Friday, May 27, 2011

Inspired by Leo's hoody

I was searching for some colour inspiration a couple of days ago and got caught up in my son's latest top!  I always find it rather amusing these days that whenever I see colours I translate them into SU names - does that happen to you?  So his top is definitely Tempting Turquoise, Real Red, Daffodil Delight and Black.

I translated those colours into a card with the generous addition of white to tone it all down a little and here is what I came up with - you'll see the cheeky monkey I used for inspiration at the end of the post! (he's at that age when they will just not sit nicely for the camera, the're always pulling funny faces for the camera - I hope he outgrows this phase soon!)


What I used:

Card:  Tempting Turquoise, Daffodil Delight, Real Red, Black, Play Date DSP.

Ink:  Basic Black

Stamp Sets:  Teeny Tiny Sentiments

Tools and other fun stuff:  Floral Fusion Sizzlets die, Button #5 die, 1/4' circle punch, scalloped border punch, word window punch, dots embossing folder.

Thursday, May 26, 2011

Happy Retirement Jo!

Our local Plunket nurse has just retired, so I wanted to make her a card to thank her for all her kindness when I used to take Leo for his checks.  It's great that she lives locally too, as I get to see her in the supermarket quite often so we won't lose touch.

This card started off as an exercise in using my new Framed Tulips embossing folder to make smaller borders, the white card is 4" x 4" and it worked really well.

The great thing about embossing folders is you can use either side of the resulting embossed card, today I chose to use what is officially the 'reverse' side of it, so technically it's debossed, not embossed!


What I used:

Card:  Pumpkin Pie, Whisper White, Chocolate Chip

Ink:  Riding Hood Red, Pumpkin Pie, Always Artichoke

Stamp Sets:  Petal Pizazz, Teeny Tiny Sentiments

Tools and other fun stuff:  Scalloped Circle punch, Buttons #5 Sizzlets die, Framed Tulips embossing folder, Stampin' dimensionals, Stampin' sponges, Stamp-a-majig

Wednesday, May 25, 2011

Deals of the Week - 25 May - 31 May

Here is the last Deals of the Week offer valid from today to next Tuesday 31st May - let me know if you'd like to purchase anything.


ItemPageDescriptionRegular PriceSale Price
11383862'Right on Track' Stampin' Around Wheel$14.50$10.15
11561968'Retro Remix' Stampin Around Wheel$14.50$10.15
119975134'Vintage Type' Rub-Ons$19.50$13.65
118760134'Play Date' Rub-Ons$20.50$14.35


Monday, May 23, 2011

Scrapbooking for the present!

Following on from yesterday's nostalgic post, here is a very bright scrapbook page that is ready to be pasted into my little boy's kindy book.  They ask every term or so for families to write something in the child's book so this time what immediately sprung to mind was his great love of board games, especially Snakes and Ladders!  He'll persuade anyone who walks in the door to have a game with him and the one game can go on and on - up the ladders, down the snakes, up the ladders again!  I love listening to his chatter as he plays, "I hope I get a 3!" (and sure enough a 3 rolls out and up the ladder he goes!).  In this page he is playing with his Nana and his big sister though his Dad is his favourite 'opponent' of all times!

I had thought of cutting out snakes and ladders but decided to go for 1 1/2" squares with numbers on it instead.

Anyway, here it is, nice and bright!


What I used - be warned!  A few non SU items crept into this project....

Card:  Gable Green (retired but a great match for the Snakes and Ladders board!), Pacific Point, Daffodil Delight and "Labour Party Red" (I recycled a Christmas card send out by the local MP last Christmas - I don't exactly follow the Labour party but all that red on it was great hehehe!)

Tools:  Non SU numbers die.

Sunday, May 22, 2011

Scrapbooking from the past - 1961 to be exact!

Some weeks ago I had a pleasure of attending my Aunt and Uncle's Golden Wedding Anniversary celebrations.  It was a beautiful day - same as the wedding day all those years ago according to Uncle Ray - and held in the same church they were married in.

After the religious ceremony we gathered for a luncheon in the hall next door and after some delicious food I wondered over to a display table set up with wedding photos, a lovely cake, a Papal blessing and a scrapbook of their wedding cards!!

Needless to say I was interested in all the items but particularly in the scrapbook, specially when mum and Aunt Pat looked through it and pointed out the card mum and dad had given them on that occasion.

I guess my point of all this is that to me that is the whole point of scrapbooking!  I was delighted to look through the pages and get a glimpse of the past, the way cards were back in those days, you could read the greetings inside, it was lovely and I felt somehow privileged to be able to do this - thanks Aunt Pat for being such a great guardian of the past.

I took some photos (of course!) as I wanted to share this special moment with you as well - enjoy!

It would be great to hear similar stories, leave me a comment with your experiences!

From left:  my dad, Aunty Monica, Aunty Patricia (the bride!) and my mum

A selection of wedding cards from 1961

Wedding bells

And a wedding belle!

Mum and dad's card to the happy couple (mum opened it and read the message and almost laughed out loud as it was almost exactly the same message she had written in the card she gave them for their anniversary!)

Not a card - just the lovely bouquet!


Friday, May 20, 2011

CAS Birthday card

Lovely sunny day here today so felt inspired to go looking for a challenge and found one at the Clean and Simple blog - hope you like it - pretty and feminine was the outcome today!


What I used:

Card:  Regal Rose, Whisper White, Tempting Turquoise, Daffodil Delight

Ink:  Tempting Turquoise, Pacific Point, Certainly Celery, Chocolate Chip

Stamp Sets:  Petal Pizazz, Sincere Salutations

Tools and other fun stuff:  Stamp-a-Majig, Stampin' dimensionals, Scallop Border punch. Buttons #5 Sizzlits die

Thursday, May 19, 2011

Butterfly Punch Pansy

I have been wanting to try making one of these pansies for quite a while now and finally got the chance the other day.  I was not too happy with the results to start with, but once I fastened them together with a gorgeous rhinestone brad, added leaves etc it ended up looking quite nice.  The colours I used for the pansy were Rose Red, Pumpkin Pie and Daffodil Delight.

I 'drew' veins in all the leaves, including the tiny ones from the bird punch using the bone folder, popped up the pansy and sentiment on Dimensionals, rounded a few corners off, and sponged most of the edges to soften it all a little.


What I used:

Card:  Melon Mambo, Old Olive, Whisper White

Ink:  Old Olive, Chocolate Chip, Rose Red, Pumpkin Pie, Daffodil Delight.

Stamp Sets:  Teeny Tiny Sentiments.

Tools and other fun stuff:  Butterfly punch, Scalloped Oval punch, Large Oval punch, Bird punch, corner rounder punch, Stampin' sponges, bone folder, Fire Rhinestone Brad.

Wednesday, May 18, 2011

Deals of the Week - 18th May - 24th May

Hi there, hope you are having a good week so far.

Here are the Deals of the week for this week, let me know if you'd like to order anything!

Look forward to hearing from you.


Item
PageDescriptionRegular PriceSale Price
119750137Daffodil Delight 5/8'' (1.6 cm) Satin Ribbon$20.50$14.35
119963137Certainly Celery 3/8'' (1 cm) Taffeta Ribbon$16.50$11.55
109112139Square Fire Rhinestone Brads$23.95$16.77
109113139Square Ice Rhinestone Brads$23.95$16.77


Saturday, May 14, 2011

CASEd Nature Walk just for you

The other day I was having a look through some card-making blogs and came upon one called The Pursuit of Stampin'ess - I really liked her cards and decided to copy one to share with you today.  I was wanting to try some of my Daffodil Delight cardstock and even though I lacked a few of her elements I made my own up - as you do!

I was quite amazed at how heavy the card turned out, but then counted the layers and it's 8 deep when you come to the little flower - no wonder it took me all morning to assemble ... crafting on and off whilst attending to family life... lots of fun making it though.


Here is what I came up with - a few different elements but same colours,  main stamp etc.


What I used:

Card:  Daffodil Delight, Baja Breeze, Whisper White, Not Quite Navy

Ink:  Not quite Navy, Baja Breeze

Stamp Sets:  Nature Walk, Simply Said, Teeny Tiny Sentiments

Tools and other fun stuff:  Vintage Wallpaper embossing folder, Word Window punch, Boho Blossoms punch, 1/4" punch, Stampin' Dimensionals.

Challenge - final card!

(Blogger has had a few issues these last couple of days, somehow this post reverted to the saved folder, but here it is again)

Original Post:
And of course I made another card on the night of the get-together and as I didn't want to replicate my original one I made a slightly different one.

This time I glued the three large flowers onto Very Vanilla, ran it through the Big Shot with the Square Lattice embossing folder, then added the other shapes on top.  A small greeting and a teeny tiny butterfly finish it off.


What I used:

Card:  Cajun Craze, Old Olive, Night of Navy, Very Vanilla, Kiwi Kiss (retired)

Ink:  Night of Navy

Stamp Sets:  Fresh Cuts

Tools and other fun stuff:  Blossom Party Originals Die, Square Lattice embossing folder, glue stick, Word Window punch, Butterfly Embosslits die,

Wednesday, May 11, 2011

Deals of the Week - 11th May - 17th May

Good morning everyone!

Hope you are all enjoying your week so far, today is my last Wednesday of having my little one at home with me all day as he starts morning kindy on Friday, he is growing up way too fast!  I'll miss his chatter in the mornings but on the bright side I'll have 5 mornings to my very own again from next week!

Without further ado here are the Stampin' Up Deals for this week:


Item
Page
Description
Regular Price
Sale Price
120963
142
Stampin Pastels "New Color Kit" (19 colours)
$34.95
$27.96
115957
151
"Thanks" Embosslits Die
$26.50
$21.20
114513
151
"Sweetest Stem" Embosslits Die
$26.50
$21.20
113483
155
"Pennant" Bigz XL Die
$91.95

$73.56


Look forward to hearing from you!


Sunday, May 8, 2011

Happy Mothers' Day to all!

I would like to take this opportunity to wish all the mothers out there who may stumble across this message a very happy Mothers' Day!  Hope your day is a special one, and that the pampering is not only restricted to today!

A few days ago I was once again having a play with the Framed Tulips embossing folder, trying to figure out a way to have the base card showing around it.  It is possible, but it means you have to cut your base card slightly wider than the average A4 size - the dimensions I used for my red background worked out to be 8 7/8" x 5 3/4".  I originally cut it at 9" but then found it would not fit a C6 envelope, so trimmed a teeny bit off and it worked perfectly.  It does mean you have to cut your base lengthways if using an A4 sheet, but that's the price for getting it exactly as I wanted it!

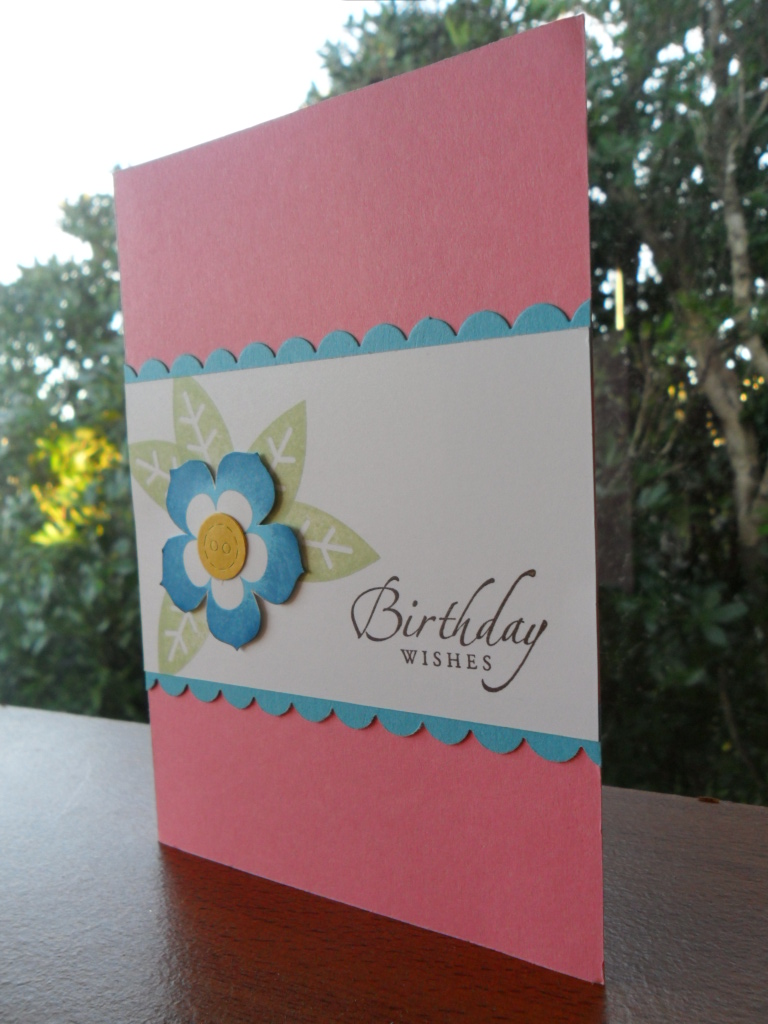
Had lots of fun with this one, it evolved throughout the morning (good thing my mum is away for a couple of days!) I started off by embossing a piece of Soft Suede (4" x 5 1/4"), then I applied Versamark ink to the edges where the tulips are, added gold embossing powder and heat-set it - it ended up looking like an antique gilded picture frame!  Using the Petal Pizazz stamp set I stamped three flowers in Pumpkin Pie and Cherry Cobbler, sponged the edges with Riding Hood Red.  Stamped a few leaves in Old Olive, cut them out, sponged the edges again, found some Riding Hood Red buttons in my stash, added those to the flowers as centres.  After assembling all the layers and flowers all that was needed was a sentiment.

Tip of the day!  Do not lay your card to be heat embossed on your self-healing cutting mat when applying heat!!!   I almost ruined my 25+ year old mat, luckily I realized just in time and was able to reverse the buckling by placing a heavy item on top of it as it cooled down....


What I used:

Card:  Riding Hood Red, Soft Suede, Very Vanilla

Ink:  Old Olive, Riding Hood Red, Pumpkin Pie, Cherry Cobler

Stamp Sets:  Petal Pizazz, Teeny Tiny Sentiments

Tools and other fun stuff:  Scallop Circle punch, Buttons #5 Sizzlets die, Framed Tulip embossing folder, embossing buddy, heat gun, gold embossing powder, Stampin' sponges, Stamp-a-majig

Saturday, May 7, 2011

Driving by to say hi - trying my hand at interactive cards

Well, what a lot of fun this was to make!  Definitely not a 'make and take' option but made for the pure pleasure of it.

I had purchased a cardmaking magazine which advertised interactive cards and after much reading and re-reading the instructions here is the result.  I think I will put a small greeting somewhere down the bottom, but will leave as is for the moment.


What I used:

Card:  Tempting Turquoise, Whisper White, Soft Suede,Play Date DSP, Haiku DSP (retired)

Ink:  Tempting Turquoise, Baja Breeze, Old Olive, Pumpkin Pie, Basic Black marker.

Stamp Sets:  Loads of Love, Fox and Friends

Tools and other fun stuff:  Scallop Oval punch, Square Lattice embossing folder, Scallop Border punch, 1/4" Chocolate Chip grosgrain ribbon (retired), stamping sponges and quite a lot of glue!

Friday, May 6, 2011

One layer card

Second post of the day - making the most of my quiet time I went looking for a challenge and found a couple that looked fun and achievable!

The first challenge is Diva Coffee Break which asked us to use Regal Rose, Soft Suede and So Saffron - the other challenge is one I've never entered before and it's called One Layer Wednesday.  I don't usually 'do' one layers, so it was quite refreshing to give it a try.  Oh, and the other thing they asked for was Circles!  So I think I've managed to tick all the boxes and this is what I came up with.


What I used:

Card:  Whisper White

Ink:  Regal Rose, So Saffron and Soft Suede

Stamp Set:  Seeing Spots (retired)

Tools and other fun stuff:  Stamp-a-Majig

And there was one more after all!

This is definitely the last card of the challenge, even though I still have the negative shapes from the Old Olive and Cajun Craze I think I'll call it quits for now!

As I used up my last flower shapes in the previous card I resorted to using one of the negative shapes as a stencil to prepare a background for today's card.  I chose the small daisy shape and the circle and sponged them onto Very Vanilla using Regal Rose, Daffodil Delight and Certainly Celery.  I ran the finished design through the Square Lattice embossing folder, matted it with Certainly Celery and then agonized over a card base colour.  In the end I went with Very Vanilla.

For a focal point I used the new Cupcakes stamp set and punch, with a Cherry Cobbler cherry, mat and greeting.


(Click on photo to enlarge)


What I used:

Card:  Very Vanilla, Cherry Cobbler, Certainly Celery

Ink:  Regal Rose, Certainly Celery, Cherry Cobbler, Daffodil Delight

Stamp Sets:  Create a Cupcake (NEW, available in the Autumn/Winter mini catalogue)

Tools and other fun stuff:  Build a Cupcake punch, 1 3/4" Circle punch, Word Window punch, Square Lattice embossing folder, Blossom Party 'stencil', Stampin' Sponges, Stampin' Dimensionals, non SU glitter glue and scalloped circle die.

Thursday, May 5, 2011

Happy Birthday Keryn

Yesterday was Keryn's birthday and as I know she has already received this in the post I can show it to all of you now!

I received the latest Impressions magazine a few days ago and wanted to try out a new technique they showcased on the cover regarding mixing embossing powders to create a dappled effect.  They used black and white but I chose to mix gold and black (you guessed it, I don't have white!) to try and recreate the effect.  You may not be able to see the results too well in the photos but it did work and looks very nice.  As I was using black and gold I decided to go for a vintage/shabby chic look so used Rose Red, Crumb Cake and a hint of black to finish off the card.

(Click on cards for larger view)


What I used:

Card:  Very Vanilla, Black, Rose Red, Crumb Cake

Ink:  Crumb Cake, Versamark Watermark.

Stamp Sets:  Fresh Cuts, Sincere Salutations

Tools and other fun stuff:  Floral Fusion Sizzlets die, Basic Pearls, Stampin' Dimensionals, gold embossing powder, black embossing powder, embossing buddy, heat gun, Scalloped Border punch, Scalloped Oval punch, Wide Oval punch.

Wednesday, May 4, 2011

More from the challenge...CAS this time

You can tell this was the last card, can't you?!  All I had left by this stage were two flowers and was craving for something relatively 'clean and simple' - hope you like it!

I embossed the last Night of Navy flower with the Square Lattice embossing folder, added the cork flower and a rhinestone as a centre.  I did a 'partial embossing' on the Very Vanilla with the Framed Tulips folder (not sure of the proper name for that technique!) so I ended up with a smaller embossed square than I used for card number two,

I added a snipped of Old Olive Ribbon, sponged the edges with Night of Navy and used my Stamp-a-majig for perfect positioning of the greeting - and voilà!

{PS - did you notice the window in the background has finally been cleaned??  Which also explains the scaffolding outside that window - Carlos was doing some work which involved cutting quite a few branches off the neighbours' trees (shhhh... don't tell the neighbours!) and then cleaning the gutters in readiness for the winter - and it was too good an opportunity to pass up so he also cleaned that window - now I won't have to jump up and down with a wet broom trying to clean it this season and that's got to be a good thing LOL!}


What I used:

Card:  Night of Navy, Very Vanilla

Ink:  Night of Navy

Stamp Sets:  Sincere Salutations

Tools and other fun stuff:  Big Shot, Blossom Party Originals Die, Square Lattice embossing folder, Framed Tulips embossing folder, 1/8" Old Olive tafetta ribbon, sheet of cork, Stampin' dimensionals, rhinestone, Stampin' sponges, Stamp-a-majig.

Tuesday, May 3, 2011

Sweet little card

Was sitting tidying my desk the other day (it's the one part of the house I really enjoy tidying up - you come upon such treasures sometimes LOL!) when I found this stamped piece I made a couple of months ago when Sale-A-Bration was on, and just had to use it even though SAB has finished for this year.

I have used this colour combo many times but simply love it, so warm and earthy, the soft buttery yellow, warm green and orange - a classic.


What I used:

Card:  So Saffron, Pumpkin Pie, Old Olive, Whisper White

Ink:  Old Olive, Pumpkin Pie

Stamp sets:  Sweet Summer (retired), Fresh Cuts

Tools and other fun stuff:  Butterfly Embosslits die, Square Lattice embossing folder, Scallop Oval punch, Large Oval punch.

Monday, May 2, 2011

Challenge - part 3

Time for card number 3!

This time I used the negative shape from the Night of Navy cardstock after the shapes were cut out.  I ran it through the Square Lattice embossing folder to add some texture and placed it over a piece of Very Vanilla which I had stamped with the little bee image from Nature Walk.

Then... I layered three flowers from the 'challenge bag' and added a large pearl in the middle.  I also punched out four stems with leaves using the Bird Punch and assembled the card.  

As a finishing touch I added three more pearls to the bottom of the card.

I really like the layered flower with the leaves... not so sure about the bees in the background though!


What I used:

Card:  Old Olive, Very Vanilla, Night of Navy

Ink:  Night of Navy

Stamp Sets:  Nature Walk

Tools and other fun stuff:  Big Shot, Blossom Party Original Die, Bird punch, basic pearls, Square Lattice embossing folder, sheet of cork

Sunday, May 1, 2011

Deals of the Week - 1st May to 10th May

Deals of the Week are back!  Would you like the chance to purchase Stampin' Up! products for up to 40% discount?  Over the next four weeks Stampin' Up! will be offering a selection of products with great discounts, contact me asap if you'd like to place an order!


This Week's Deals:

Item
Page
Description
Regular Price
Sale Price
121578
37
Tag Alongs Wood-Mount Set
$38.95
$23.37
120468
59
More Monkey Accessories Clear-Mount Set
$29.95
$17.97
121550
59
More Monkey Accessories Wood-Mount Set
$36.95
$22.17
120003
75
Cottage Garden Clear-Mount Set
$31.95
$19.17
119163
75
Cottage Garden Wood-Mount Set
$39.95
$23.97
121494
98
Compliments to the Chef Wood-Mount Set
$43.95
$26.37


Look forward to hearing from you!